What is “On-machine measurement” for grinding machines using touch probes?

CNC grinding machines determine the quality of workpiece finishing.
Grinding requires stringent accuracy. Have you ever worried about problems like this?
- "Setup and movement for measurement with 3D measuring instruments take too much time…"
- "Measurement methods vary by person…"
- "How can we get rid of the reworking and additional machining after measurement?"
It is a must-read for anyone hoping to improve the manufacturing process, including grinding.
Summary of article content
- Easier machining setup and dimensional measurement
- Details on how “on-machine measurement” for grinding machines can lead to dramatically reduced processes
- How to standardize the work now considered artisanal
- How to introduce on-machine measurement for CNC grinding machines
Table of Contents
What is on-machine measurement? Differences from off-machine measurement
Many people may feel that the advantages of on-machine measurement are not clear.
Let us review them briefly.
On-machine measurement
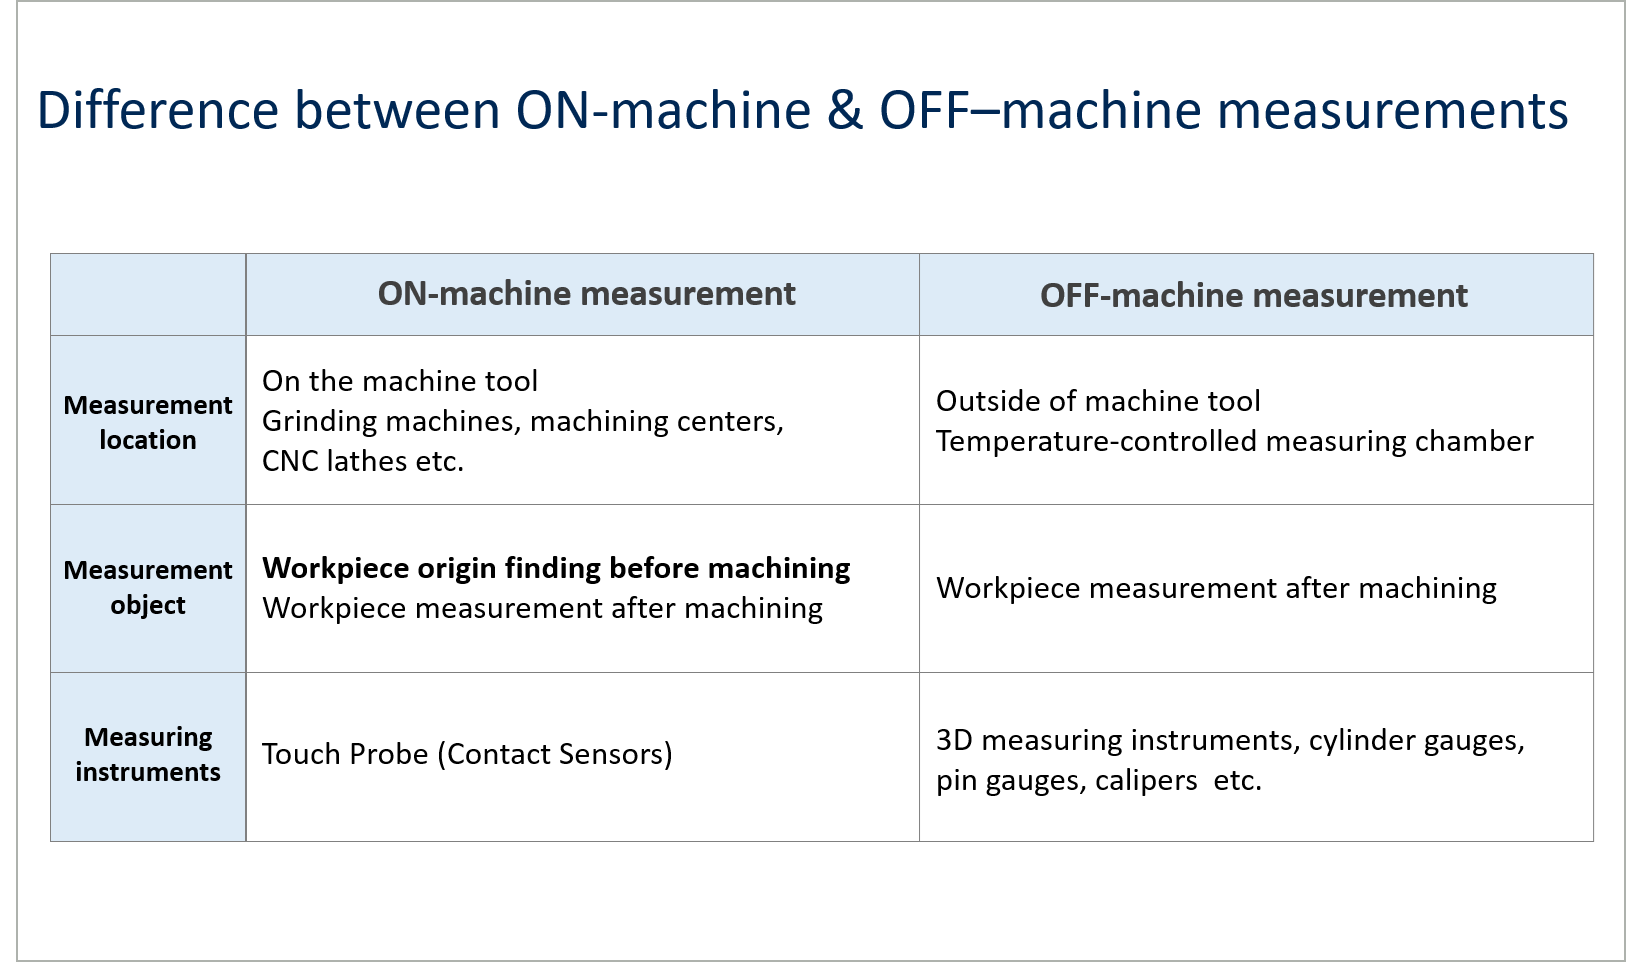
On-machine measurement means "measuring the workpiece on the machine tool."
This article focuses on grinding machines, but the same process takes place with machining centers, CNC lathes, and other machine tools.
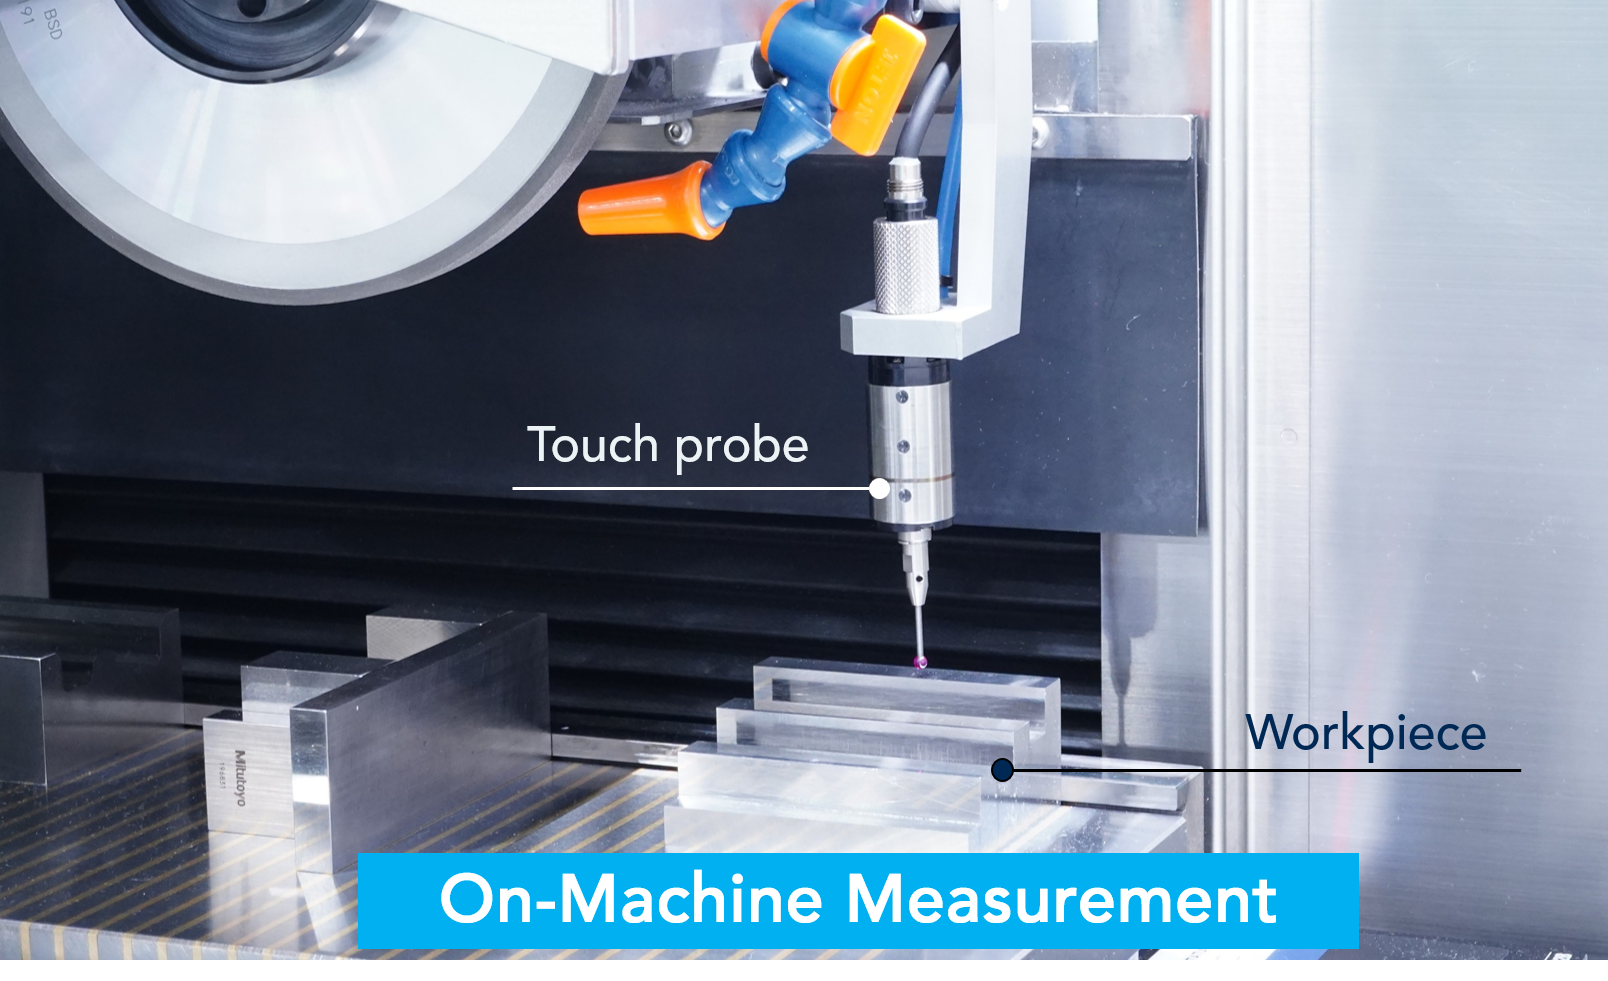
The main measuring instrument used is the contact sensor called a touch probe. The sensor measures the workpiece dimensions based on the machine's position information when the sensor contacts the workpiece. (Refer to Image 1)
Purpose of On-machine measurement
On-machine measurement has two basic purposes.
- Workpiece origin finding before machining
- Workpiece dimensional measurement

Off-machine measurement
Off-machine measurement means "measuring the workpiece off the machine tool."
The machined workpiece is removed from the machine tool and measured with instruments such as
3D measuring instruments, cylinder gauges, pin gauges, calipers and so on.
- 3D measuring instruments
- cylinder gauges
- pin gauges
- calipers and so on.
While it depends on the required accuracy, generally higher-precision measurement is conducted in a temperature-controlled measurement room. When falling below tolerance in measurement, the workpiece is returned to the machine tool for additional machining.
Review of the grinding cycle
General grinding cycle
The choice between on- and off-machine measurement significantly affects the machining cycle processes.
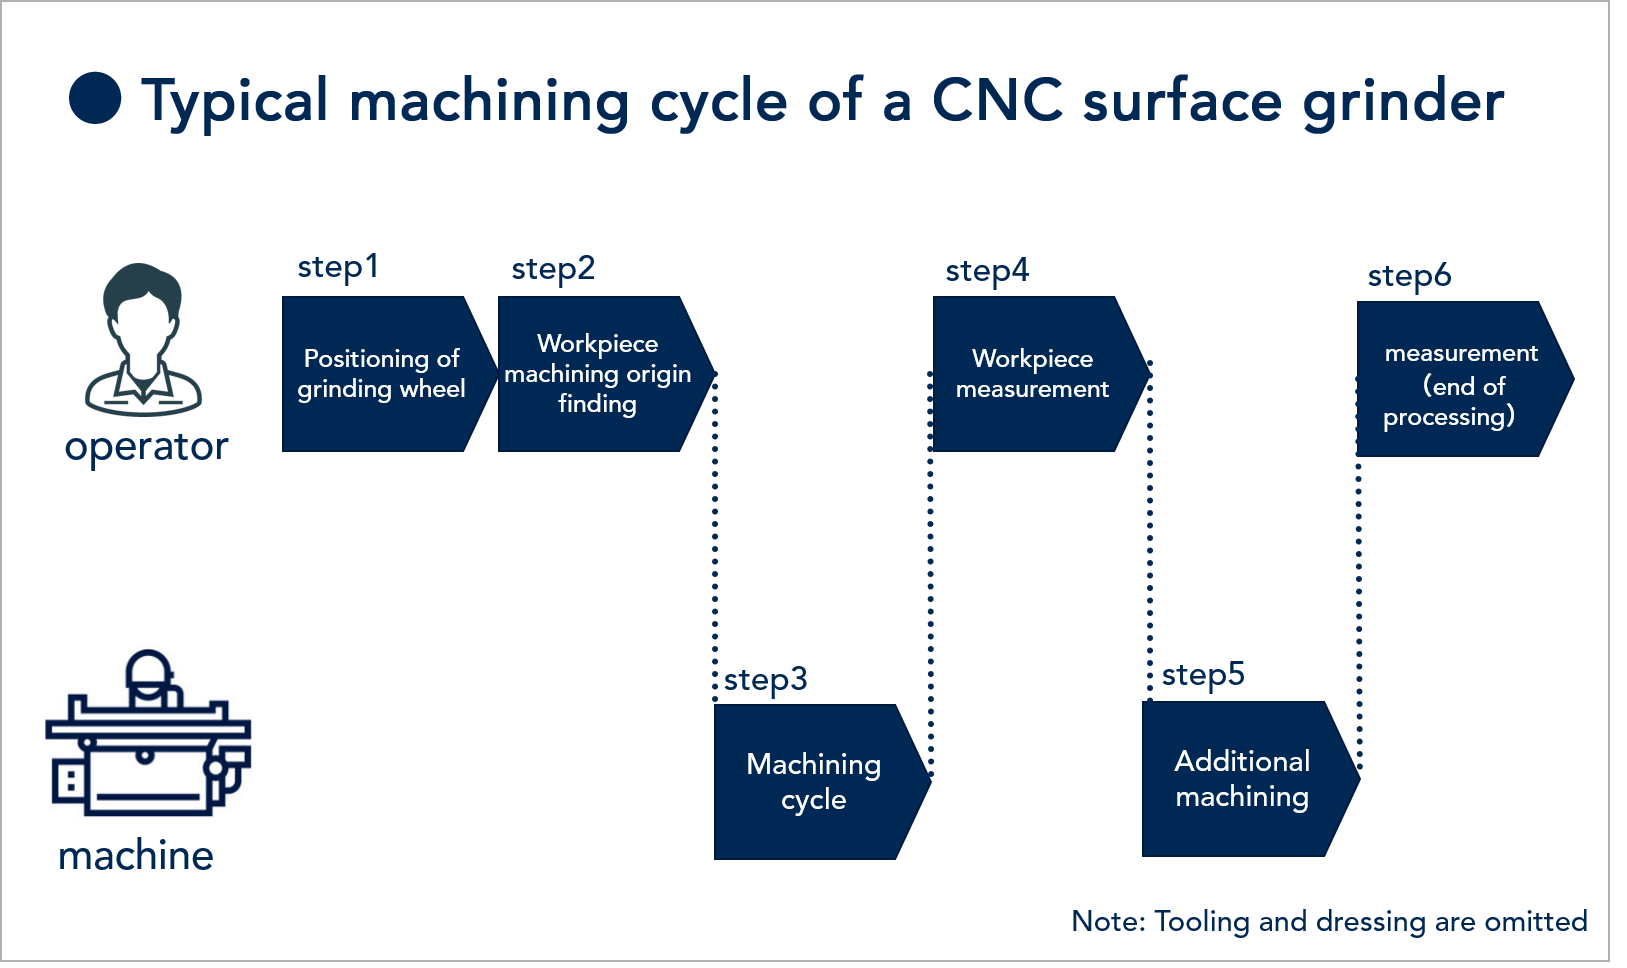
Here we will briefly review the CNC grinding machine "Grinding Cycle Steps 1-6" on which this section is based.
- Step 1: Confirm the machining start position through grinding wheel application
- Step 2: Confirm the workpiece machining start position (thickness measurement)
- Step 3: Machining cycle
- Step 4: Workpiece thickness measurement
- Step 5: (when thickness is insufficient) Additional machining
- Step 6: Post-machining measurement
Grinding consists of the above six steps. (Tooling and dressing are omitted in this article)
All processes are significantly affected by the choice of whether to use on- or off-machine measurement for Step 4: Workpiece thickness measurement and Step 6: Post-machining workpiece measurement.
Here we simulate the processes for each measurement method, (1) and (2), and explain their comparison.
What are the secret disadvantages of Off-machine measurement?
Normally, when the workpiece is measured after machining and found to be out of tolerance, the machining process includes returning the workpiece for additional machining until it meets the standard. With off-machine measurement, this process includes the following "wasted processes," which need to be eliminated.
- Workpiece removal
- Worker movement
- Workpiece resetting/setup
- Reworking based on measurement results (out of tolerance)
- Buildup of workpieces awaiting measurement
These processes are problems on site, causing increased lead time before shipping and rising costs.
Process simulation of Off-machine measurement
Here we explain this process simulation of off-machine measurement using an example.
Ex.: (1) Grinding → (2) Measurement → (3) Additional machining → (4) Measurement cycle
In this cycle,
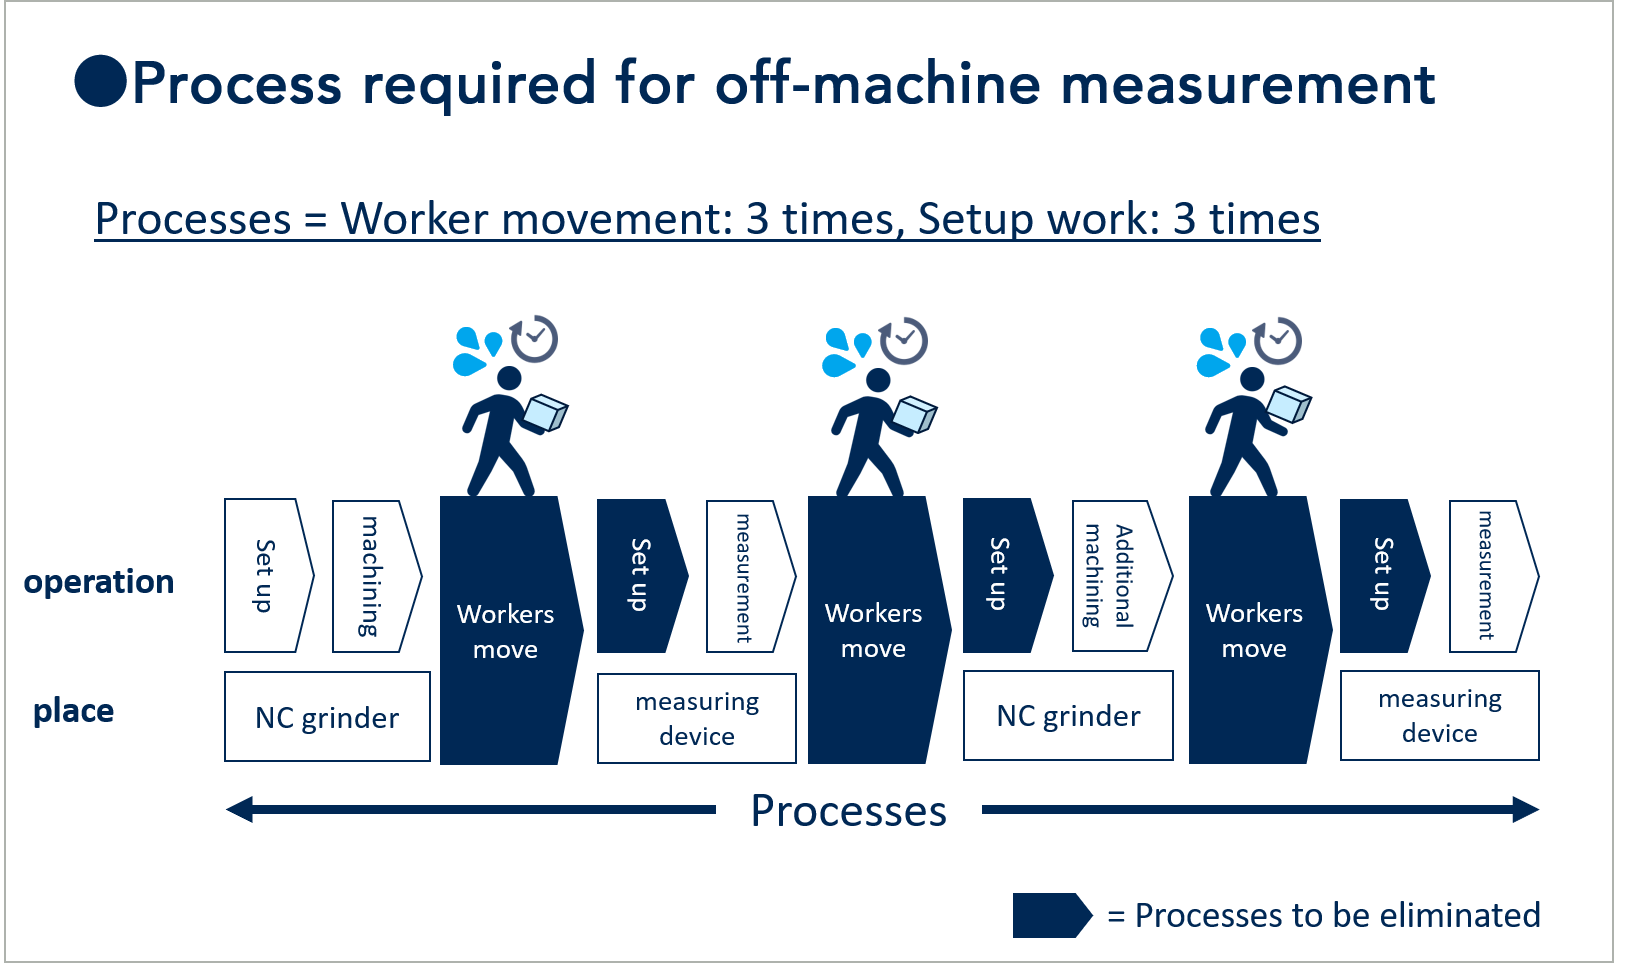
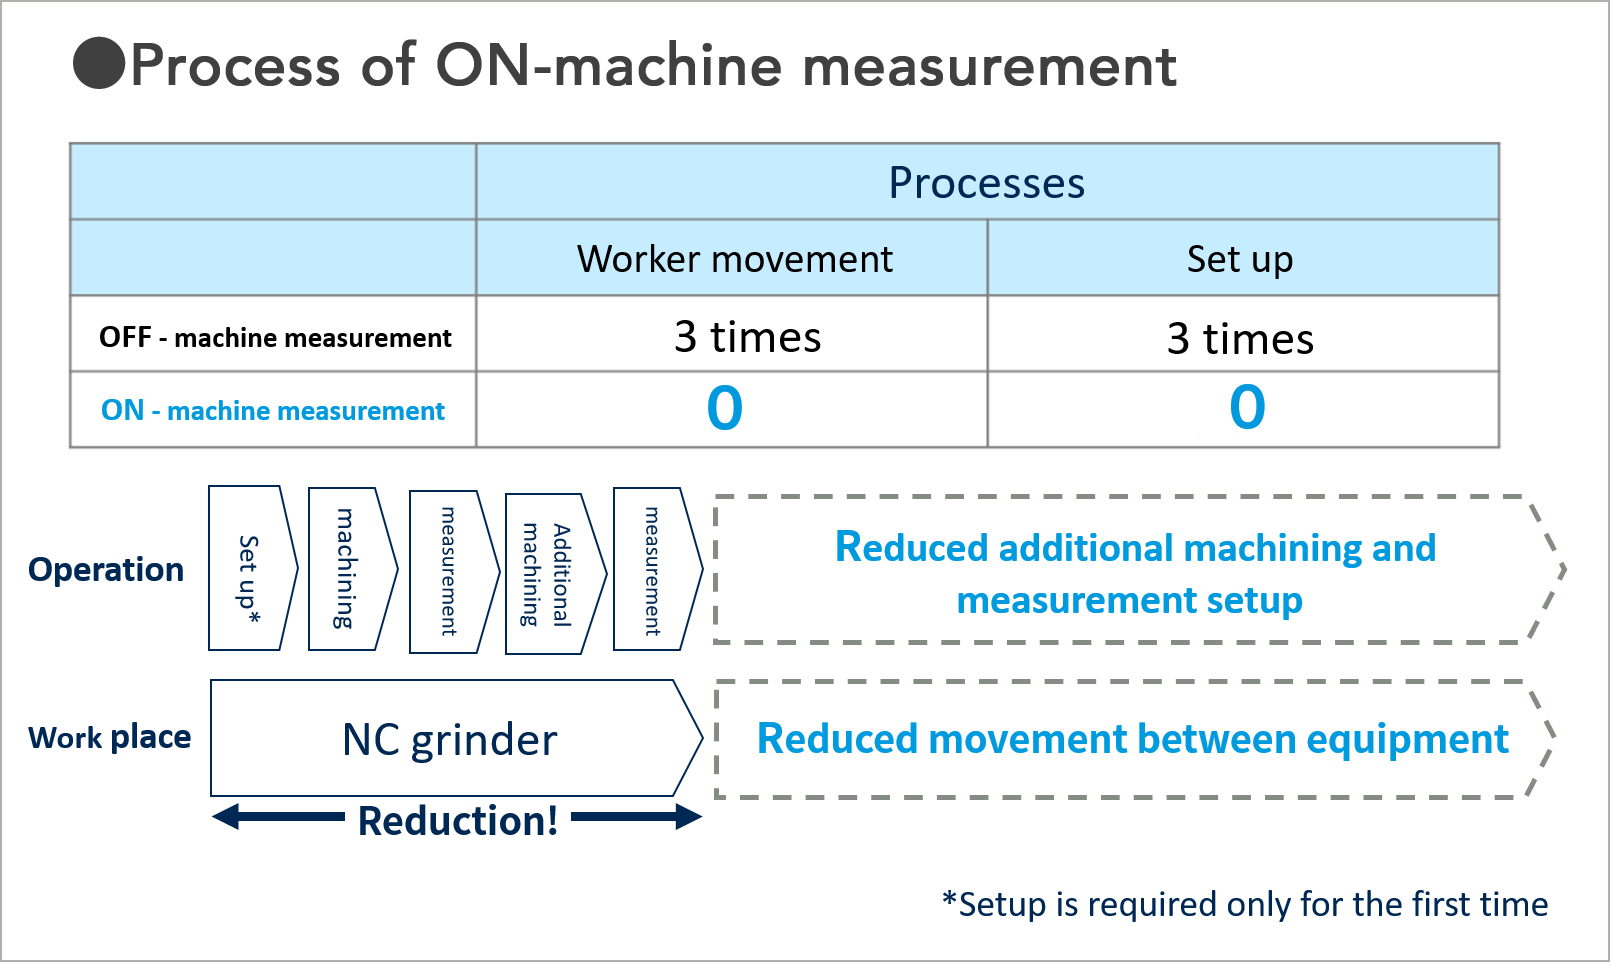
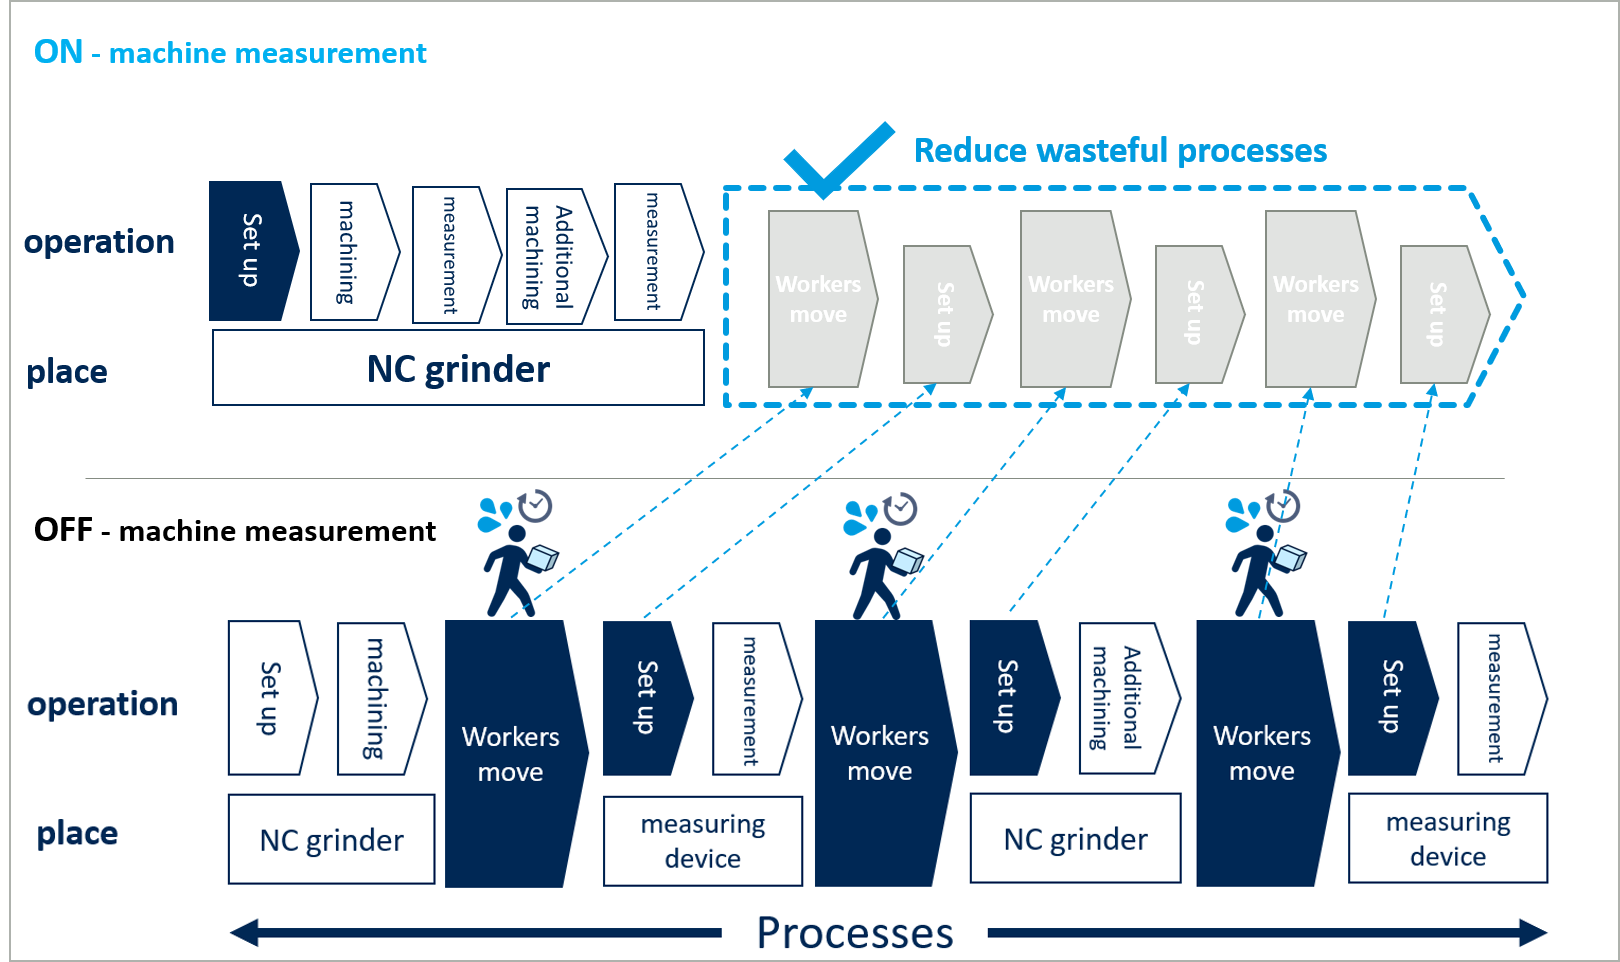
- workers move 3 times
- setups 3 times (machining setup: 1 time, setting to measuring instrument: 2 times)
*Only the first setup is essential. (Refer to Fig. 1)
Setup work such as workpiece mounting, removal, and positioning is required every time, for both the grinding machine and the measuring instrument.
Next, we will explain how much the process changes when using on-machine measurement compared to off-machine measurement.
Advantages of On-machine measurement
On-machine measurement using a touch probe has the advantage of reducing processes by conducting all the processes from (1) machining through (4) measurement on the equipment.
- Workpiece removal is no longer required
- Workpiece resetting is no longer required
- Worker movement is no longer required
- Multiple workpieces can be handled
Using the same example as with off-machine measurement, let us see how many processes can be eliminated.
Process simulation of On-machine measurement
Ex.: (1) Machining → (2) Measurement → (3) Additional machining → (4) Measurement cycle
In comparison with Off-machine measurement, we find that processes can be improved thus:
- Worker movement: 3 times (off-machine) → 0 times (on-machine)
- Setup work: 3 times (off-machine) → 0 times (on-machine).
(Refer to Fig. 2)
Comparison of on- and off-machine measurement processes
The difference in processes between on- and off-machine measurement is immediately apparent.
For example, if the combination of (movement + setup) takes 20 minutes, then eliminating three times through this process saves almost an hour of wasted time.
How good is the measurement accuracy of On-machine measurement?
This is why grinding machines are perfect for On-machine measurement.
There is no point in reducing processes if the accuracy is so low that the measurement is not functional.
How accurate can on-machine measurement be? Here we discuss this point.
Why are grinding machines perfect for On-machine measurement?
The greatest advantage of on-machine measurement is that measurement can be conducted with the workpiece accurately positioned.
With off-machine measurement, the stricter the workpiece tolerance, the more time and trouble required for resetting to the machine and measuring instrument.
Resetting involves the risk that changed positioning conditions will lead to machining defects or measurement error.
In this regard, measurement of the workpiece while still chucked in place reduces time and trouble and enables high accuracy.
The positioning conditions also remain the same, so simultaneous machining of multiple workpieces is possible.
Next, we will compare the accuracy of on- and off-machine measurement.
Examining the accuracy of On-machine measurement (reference data)
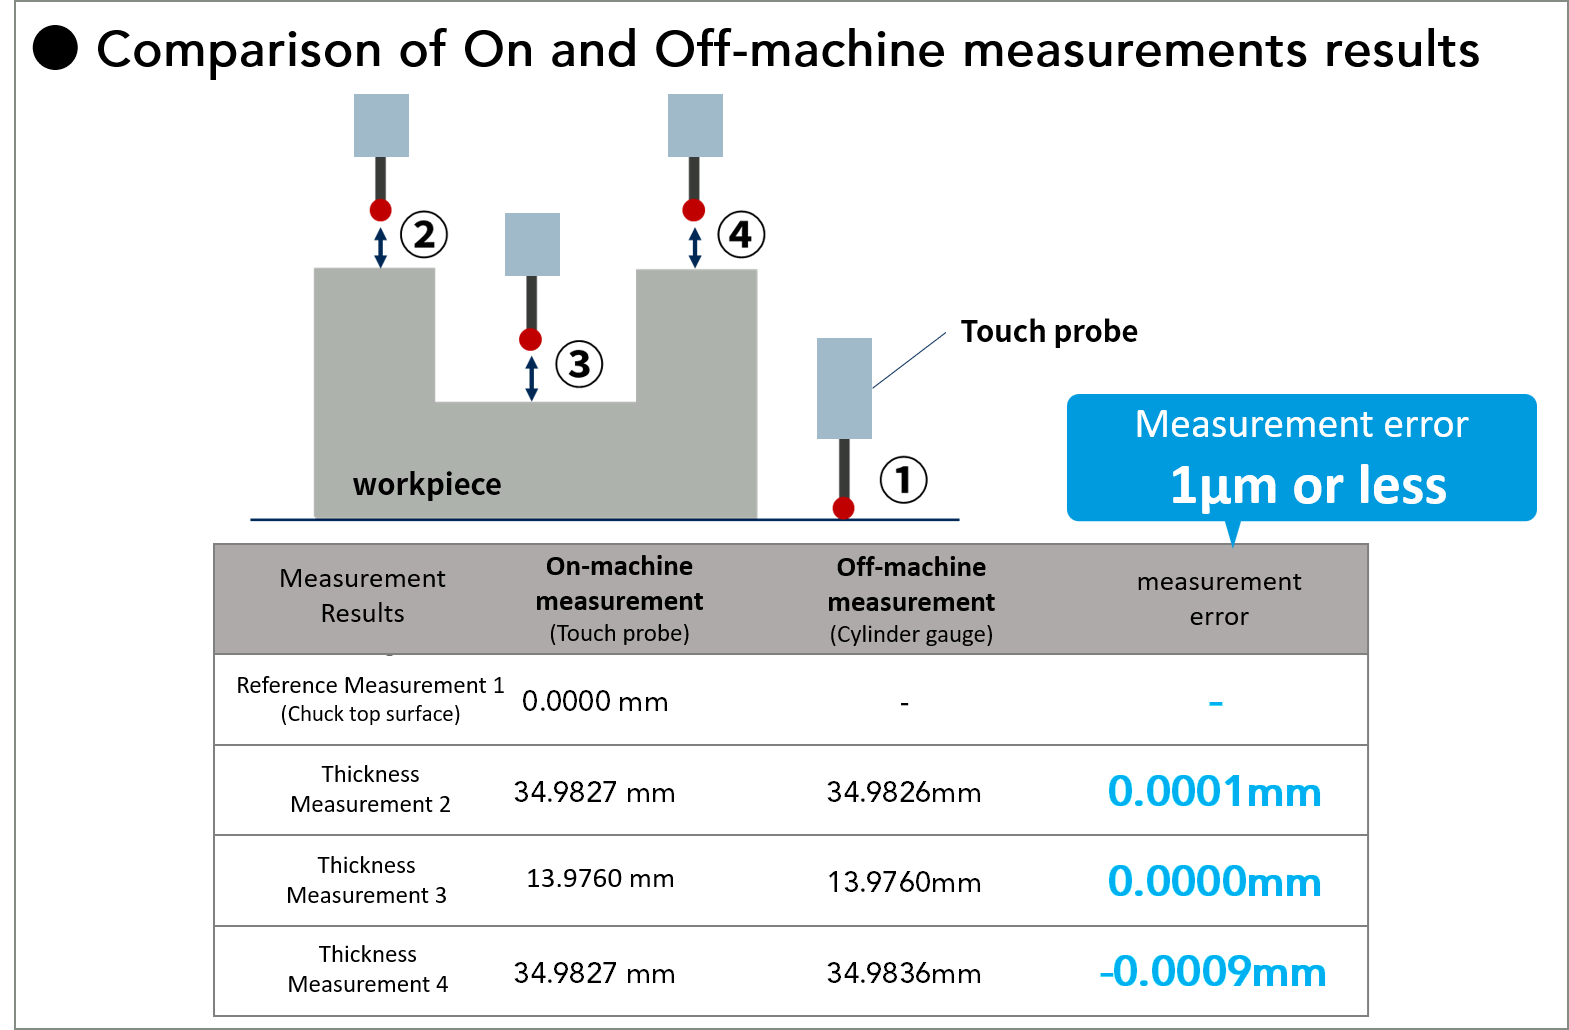
The workpiece thickness measurement data for on- and off-machine measurement (cylinder gauge) is shown below.
The data in the figure below indicates that on-machine measurement also enables high-accuracy measurement with error of 1 μm or less.
There are some concerns that post-machining measurement of workpieces on-machine will cause the workpiece dimensions to change by a few micrometers due to thermal expansion.
The important point here is to make use of the measurement results to reduce processes.
There are various effective ways to make use of the measurement results, such as taking account of thermal expansion in advance and setting standards for additional machining on site so as to reduce reworking post-measurement.
Introducing CNC grinding machines where On-machine measurement is possible
As of now, Okamoto Machine Tool Works' HPG Series surface grinding machines enable on-machine measurement with Quick Touch equipment. They offer the following proposals enabling easier introduction and countermeasures for biases such as
- it's too expensive to introduce
- the programming makes it too difficult to introduce
- there's a risk of breaking the stylus or sensor.
- Affordable introduction costs
- Dedicated dialog programming (no-programming) function enables use by any worker
- Measurement accuracy with repeatability of 1 μm
[Video] On-machine measurement demo with an NC grinding machine
Two reasons why On-machine measurement is important now
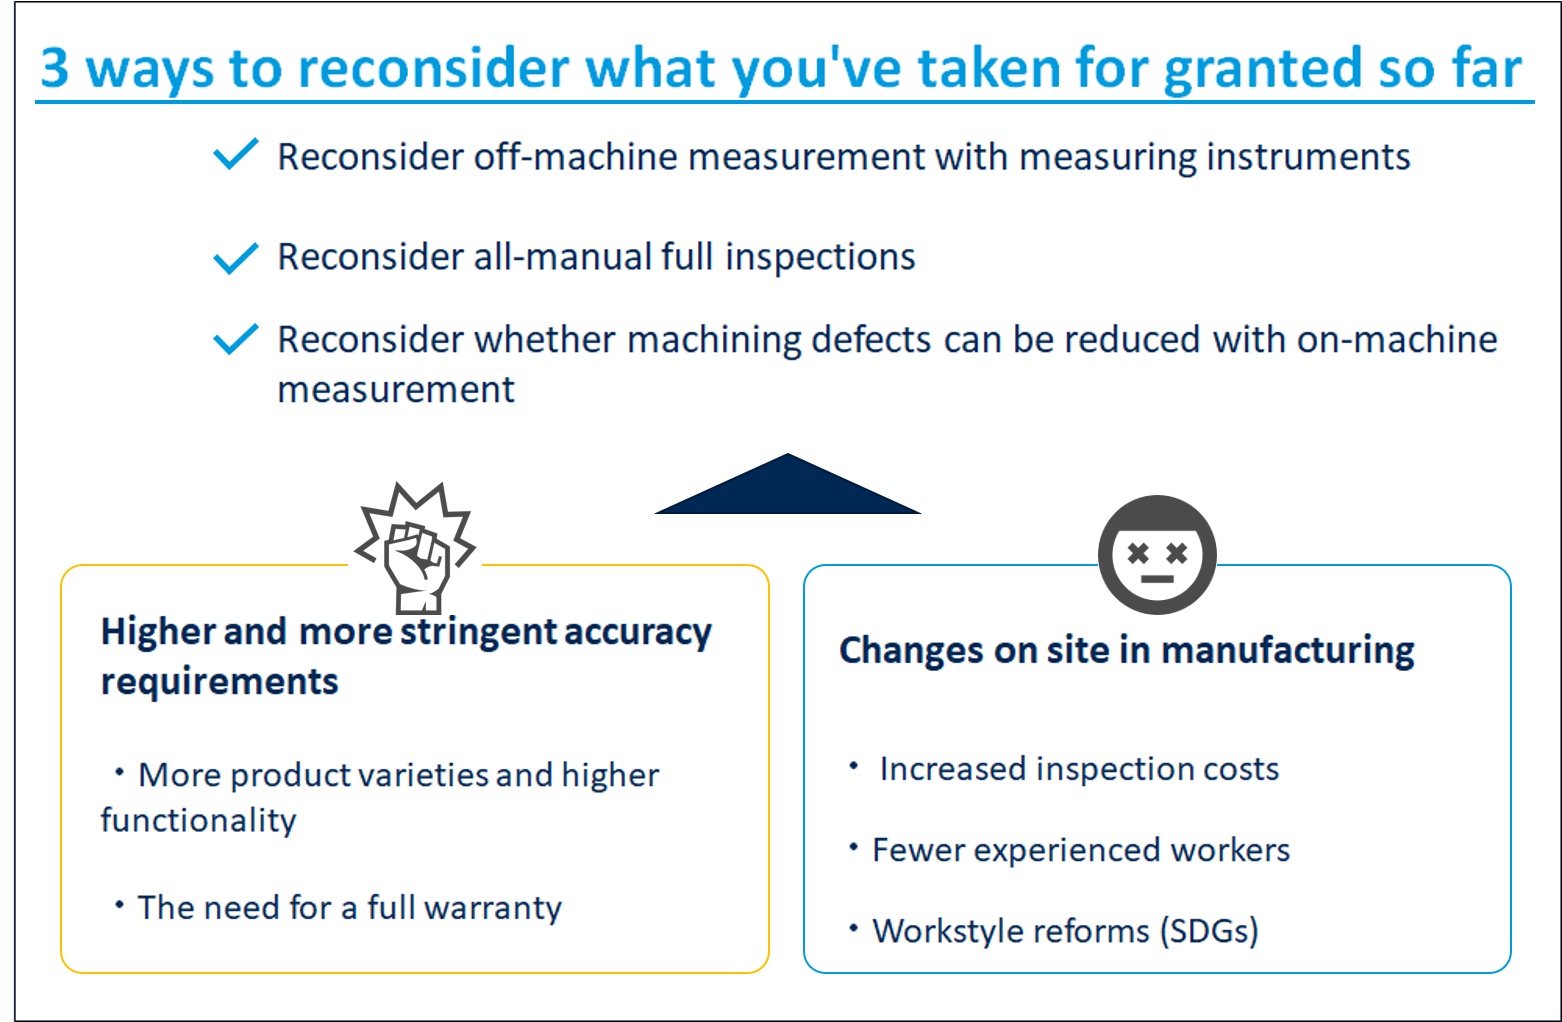
Reason 1: Are the measurement methods at manufacturing sites appropriate?
Manufacturers are constantly struggling between the quality demanded by their customers and their costs.
Client demands become yearly more stringent as well.
- "We can't reflect the increased inspection items in the price, so we have no option but to perform free inspections…"
- "(Measuring instruments) are so expensive, it's a waste not to use them…"
- "It's getting harder to find people who can do the inspections"
Unprofitable inspection processes are increasing, with on-site staff struggling with personnel issues (costs).
Overburdened inspection systems risk overlooking defects or provoking fraud.
In order to improve the measurement rules, the first points to review are
・Can the current measurement quality be realized at lower cost?
・Are the costs appropriate?
Start by examining whether on-machine measurement can judge the quality required by the client, and make a suitable judgment.
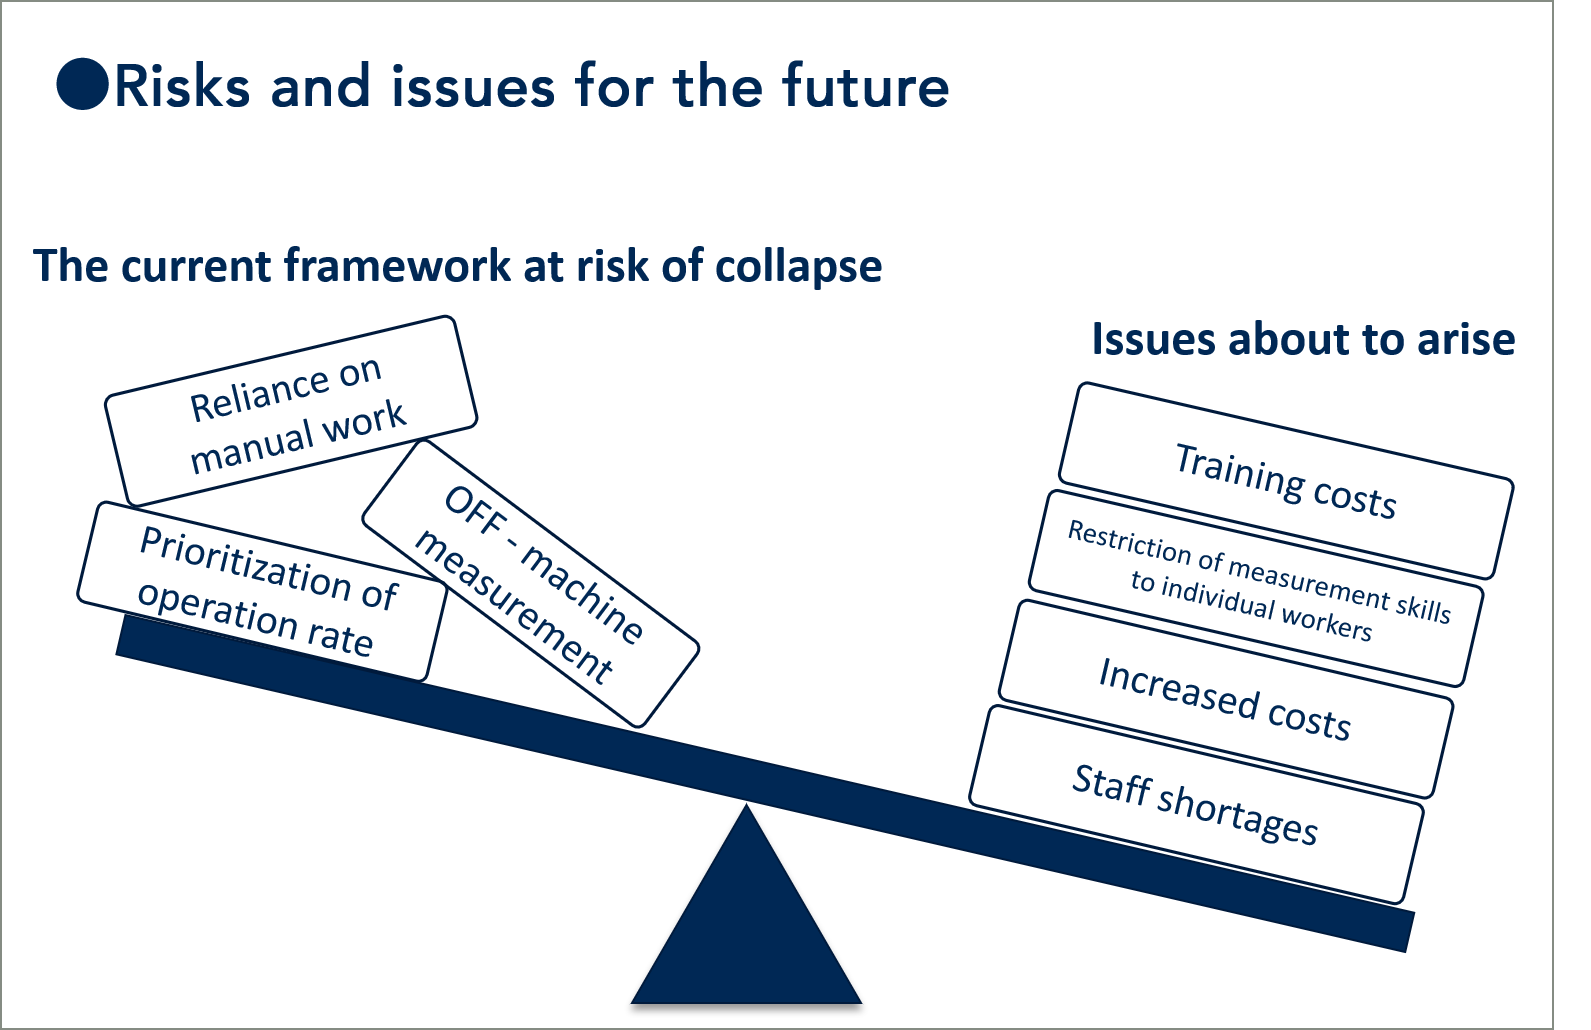
Reason 2: Is the era of “avoiding On-machine measurement because it slows operation rates” behind us?
Instead of "partial improvement only in one's own department," "total optimization of the manufacturing process across departments = process consolidation" is required.
So far, optimization by department has been prioritized:
- The machining department increases its machine operation rates
- The inspection department makes sure not to overlook defects through staff increases and dedicated inspection lines
However, from here on it will be important to make improvements that benefit all the departments.
The current organizational system and frameworks may work now, but are they sustainable for five or ten years? This has to be taken into account.
How do you decide when to use On-machine measurement and when to use 3D measuring instruments?
Measurement is the checkpoint protecting quality.
For precision-machined parts such as molds or aircraft parts in particular, 3D measuring instruments provide high reliability.
For precision-machined parts such as molds or aircraft parts in particular, 3D measuring instruments provide high reliability.
Elsewhere, be aware that highly specialized measuring instrument require the following maintenance costs.
- Temperature control
- Collaboration between machining and measurement departments
- Learning how to operate the measuring instrument
- Lack of profitability based in the measuring instrument itself
With CNC grinding machines, where final finishing level accuracy is required, high-accuracy measurement is possible as well as machining.
If measurement can be aggregated into the grinding machine, most likely inspector training costs can be reduced along with variation in measurement depending on the inspector.
Try combining the options in a suitable balance.
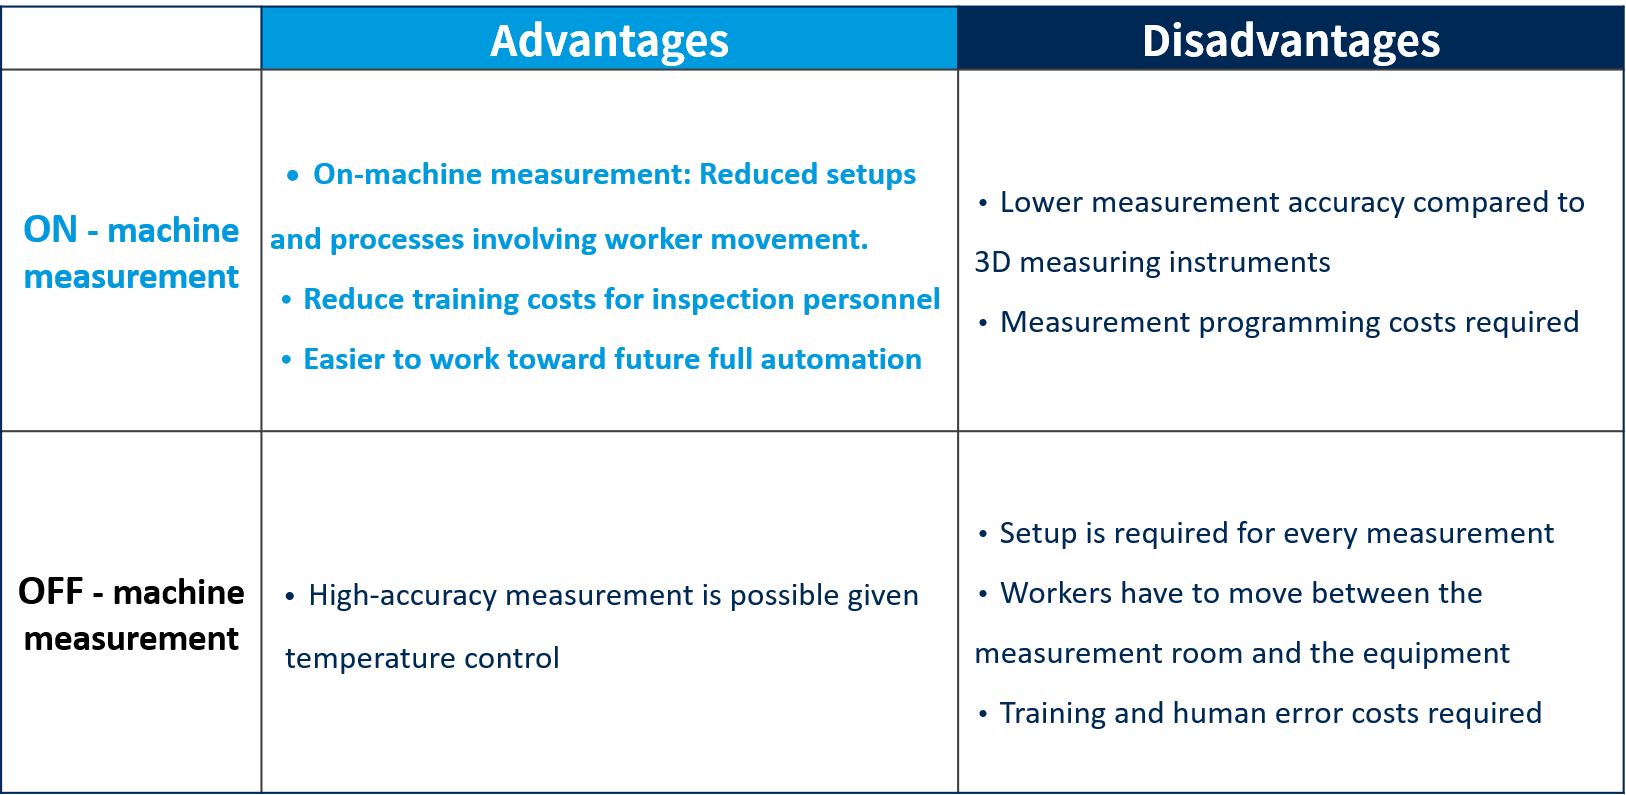
Summary: Advantages and disadvantages of On-machine measurement
Advantages
- On-machine measurement: Reduced setups and processes involving worker movement.
- Off-machine measurement: High-accuracy measurement is possible.
Disadvantages
- On-machine measurement: Measurement accuracy is likely to be affected by external factors in comparison to 3D measuring instruments, etc.
- Off-machine measurement: Numerous measurement processes required, and high maintenance costs (staff/devices/operation).
Other advantages and disadvantages can be summarized as below.
As previously noted, measurement is an important process which brings machining quality to light.
Elsewhere, the added value of the processes involved in measurement is not easily grasped.
Consider on-machine measurement as a way to optimize the manufacturing site as a whole, balancing the needs of the machining and measurement departments.
Touch probe for On-machine measurement, usable with grinding machines
Compact touch probe [K3S series]
Ultra compact! Automates workpiece originating in a small space!
Automation of NC Grinding Machines [Introduction]
This is a thorough explanation of the automation of the “grinding wheel application process,” which is checked by sparks and sound when the grinding wheel hits the workpiece.
Combined with on-machine measurement, this is the industry’s first technology that fully automates the entire process from setup to machining on an NC surface grinder.
![Compact touch probe [K3S series]](https://metrol-sensor.com/wp-content/uploads/2025/05/K3S_4c-3-800x530.png)
![Automation of NC Grinding Machines [Introduction]](https://metrol-sensor.com/wp-content/uploads/2021/12/de5e9f7b7a1ba407bdca291ed3cffa77-2-800x530.png)